


The
Calm Creative


Why Your Textured Floral Art Looks Flat (And How to Fix It with Tip #1)
This post contains affiliate links, which means I may earn a small commission at no extra cost to you. I only share what I actually use at my own kitchen table.
If you’ve ever finished a textured floral piece, stepped back, and felt a wave of disappointment because your petals looked flat, lifeless, you are not alone. This is exactly how I felt when I first sat down to start learning and its what I hear MOST when talking to beginners.
The #1 mistake beginners make is treating modeling paste like traditional acrylic paint.
The Quick Takeaway: Traditional paint relies on color and light illusions for depth. Textured art relies entirely on actual physical dimension. Because a single petal is usually one solid color, it needs literal, physical height to catch the light and cast its own shadows. Without that height, your art will always look flat.
1. Why Beginners Hold Back: The Fear of Wasting Product
Why do we naturally spread paste so thin? Usually, it comes down to a subconscious fear of wasting product or making a massive mess on the canvas.
Beginners often hold themselves back, scraping the palette knife too clean across the board, terrified they’ll run out of supplies. But when you treat modeling paste like a thin glaze instead of a sculptural medium, you rob your flowers of the very thing that makes them pop off the canvas.
When you consciously release the fear of wasting product, you unlock the ability to load your knife properly and build real 3D form.
2. What “Using More Texture” Actually Means (And Choosing the Right Paste)
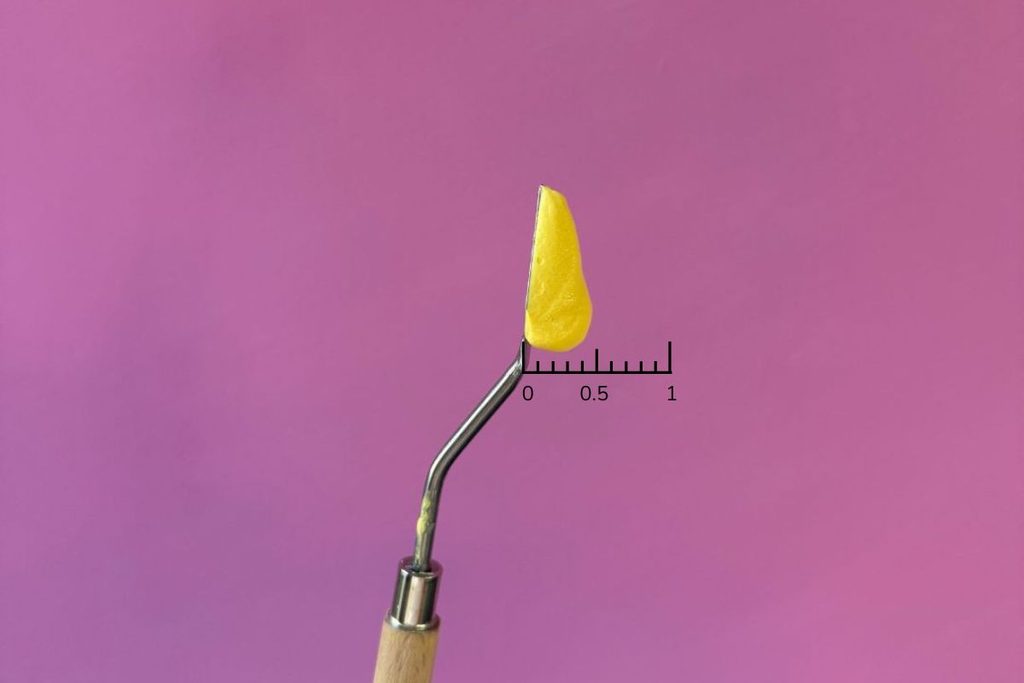
To get true dimension, you need to build a bold, structural height on your palette knife (think 0.5in) so the petal can hold its own distinct, sculptural shape without slumping.
This is why your choice of medium matters immensely. If you use heavy body acrylic paint or cheap craft glue-based pastes, a thick pile will crack or slide right down the canvas as it dries.
This is why I exclusively use Liquitex Light Modeling Paste. It is specifically engineered with a lightweight, flexible formula that holds heavy peaks and dimensions without sagging, shrinking, or cracking as it cures.
Grab my free materials list with my favorite materials I buy each week.
Once you trust your medium, a major mindset shift happens: the paste feels heavy when wet, and it looks thick on your knife. But remember, modeling paste flattens slightly as it cures and dries. You have to start thicker than you think. If it looks right when you first lay it down, it will likely dry too flat.
3. Step-by-Step: How to Lay Down a High-Dimension Petal
Knowing you need more texture is the first step. Executing the stroke is where the physical transformation happens:
- Step 1: Load the knife correctly. Scoop a generous amount of texture onto your palette knife. The top side of your knife should be clean, while the underside should be heavily loaded (about 1/2 of an inch thick).
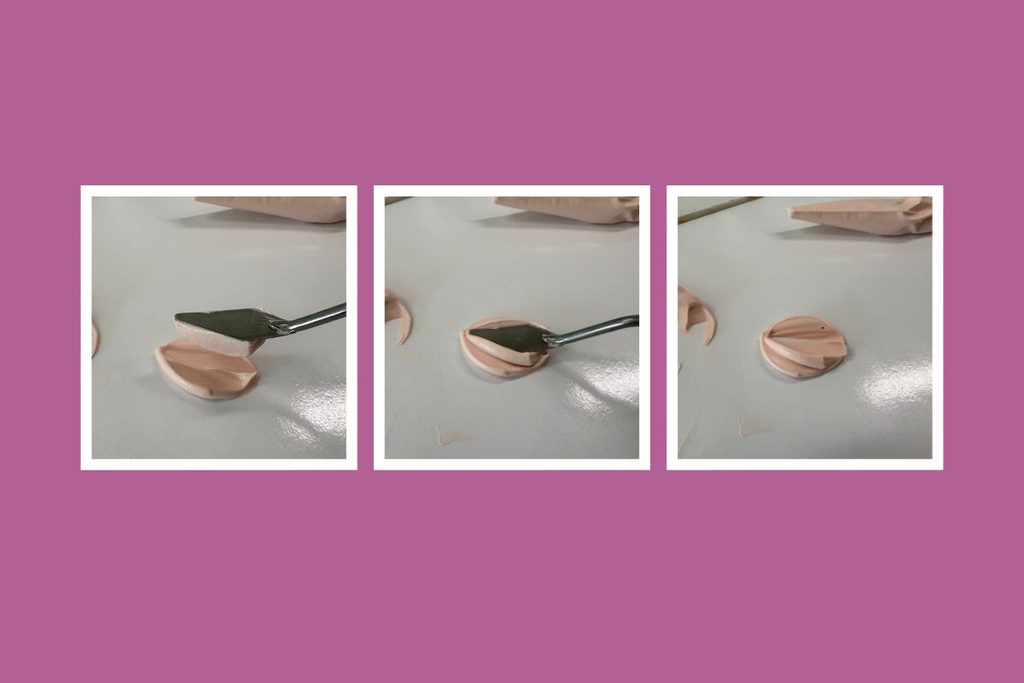
- Step 2: Commit to the stroke. Place the knife down at a 45-degree angle to the canvas, pressing down—but not all the way to the board. Right before you make full contact, pull up and out in one clean, fluid motion without hesitating or second-guessing.
- Step 3: Leave it alone. Resist the urge to go back and smooth, poke, or fix the petal. Touching a laid petal after the fact creates an overworked, bumpy look. Place it once, and aggressively move on.
Pro-Tip: If your petal starts to sag or slide downward on the canvas, your paste was either too wet or you applied it at too steep of an angle. Scrape it off with a wet paper towel and try again with a cleaner, firmer load on your knife.
Ready to Skip the Trial and Error?
You can absolutely take Tip #1, practice it on your own canvas, and start seeing your petals pop with brand-new dimension.
But knowing you need more texture is only half the battle. Mastering the exact knife angles, pressure control, and timing across 16 different floral styles takes practice—and trying to figure it all out through trial and error can cost you weeks of frustration.
If you want to skip the guesswork and watch my exact palette knife movements and tool techniques in slow motion, I built something specifically for you. My Texture Studio course breaks down the entire process step-by-step, showing you how to handle your tools and master your mediums.
[Click here to explore the Texture Studio course and master your dimensional art today.]


Leave a Reply

@jenlaurentaylor
come hang with me on


